Onboarding
The supplier onboarding process describes all actions from inviting a new vendor into your system until the vendor has been successfully created into Dynamics 365 FO. Several steps are required by multiple stakeholders to get a successful onboarding, and make sure that the vendor information is accurate. Typically, the following roles are involved in this process:
Accounts Payable Clerk: Invites a new vendor and reviews onboarding information before creating vendor in the system.
Vendor invited user: Receives supplier invitation and registers his company as one of your suppliers by creating an account in Eftsure , and answering all questions, such as bank account information, addresses, contact information etc
Eftsure verification team: Validates the supplier information by either matching with existing vendor information or placing a call to vendor to verify all details.
This process is described in the following cross functional flowchart:

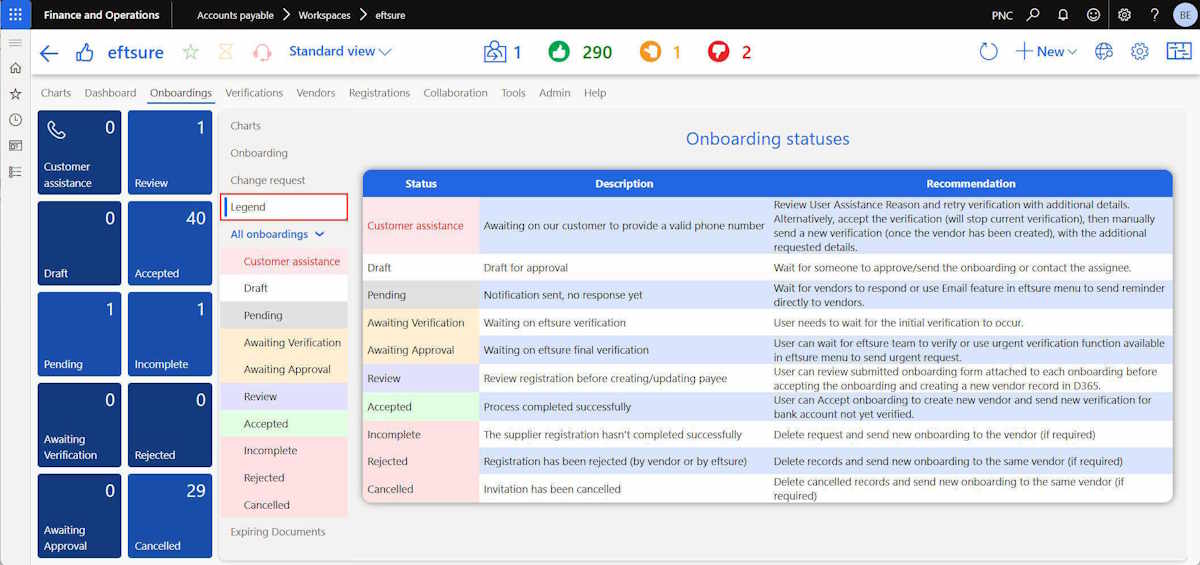
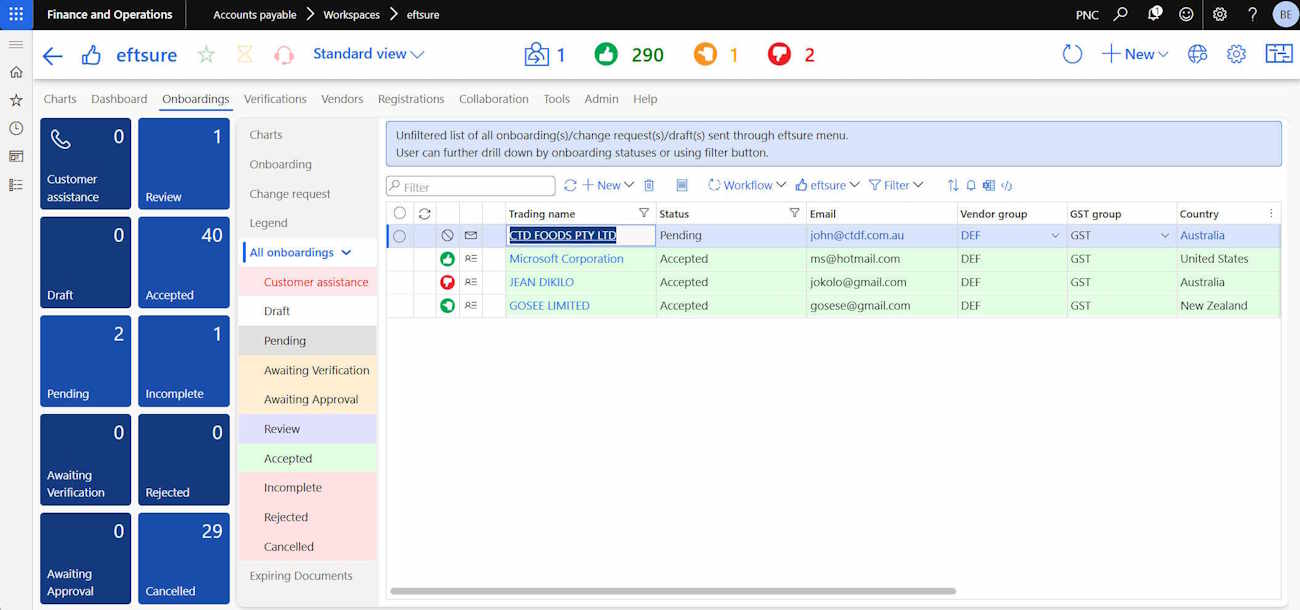
Onboarding status
Onboarding status can be viewed in Eftsure workspace > Onboardings > Legend.
Onboarding forms
Onboarding forms are used to retrieve supplier information from the supplier, after receiving the Eftsure invitation. These forms contain all required fields such as name, ABN, address, etc.
Additional custom sections and fields can be added or hidden to query the supplier for additional information.
Entire sections of Eftsure forms can be hidden in the Eftsure portal form designer.
These forms are created and maintained directly in the Eftsure portal, then downloaded to Dynamics 365 FO.
The forms are available in the workspace Eftsure > Parameters > Onboarding > Forms.
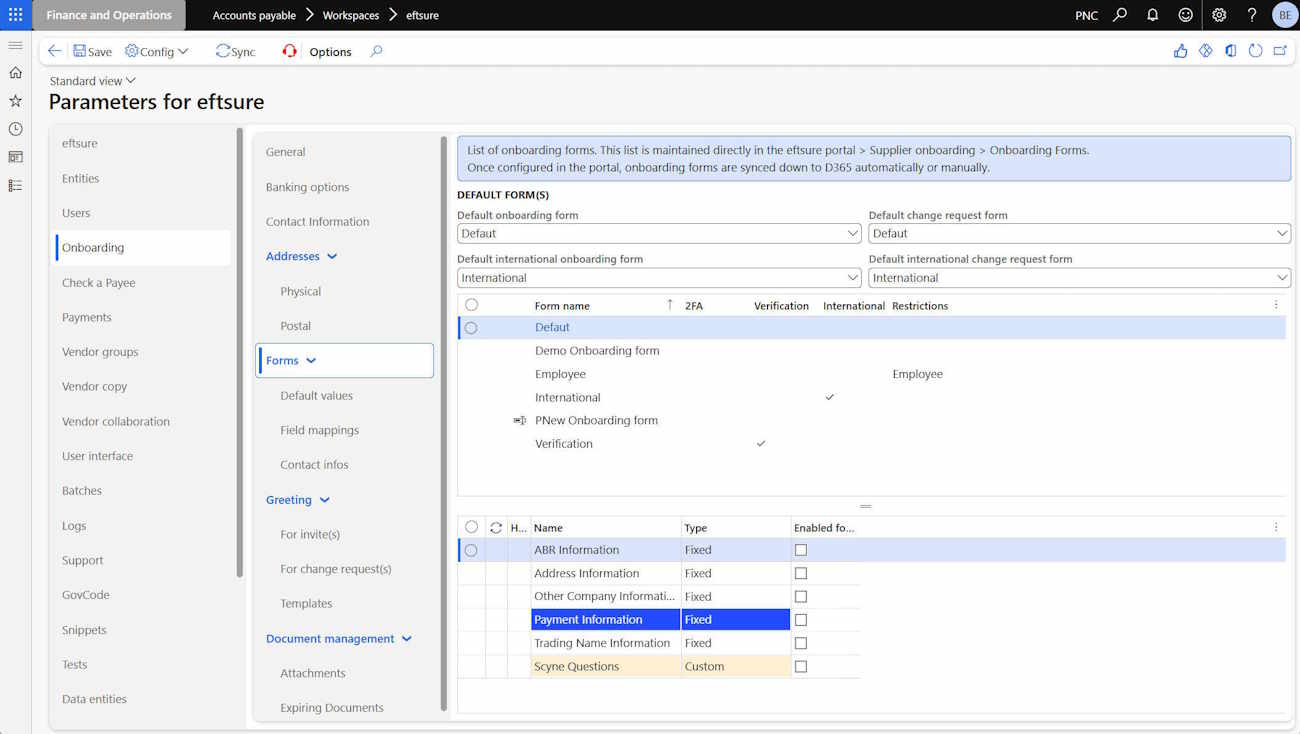
The following forms definition are read-only and any changes need to occur in the Eftsure portal, prior to be synchronised to Dynamics 365. Once changes have been performed in Eftsure portal, the user can manually resync forms or a default daily morning batch will sync if enabled.
Onboarding invitation wizard
The Standard invitation wizard is split in 3 steps including: New vendor details, Greeting, Options. The wizard steps can be modified based on Parameter setup.
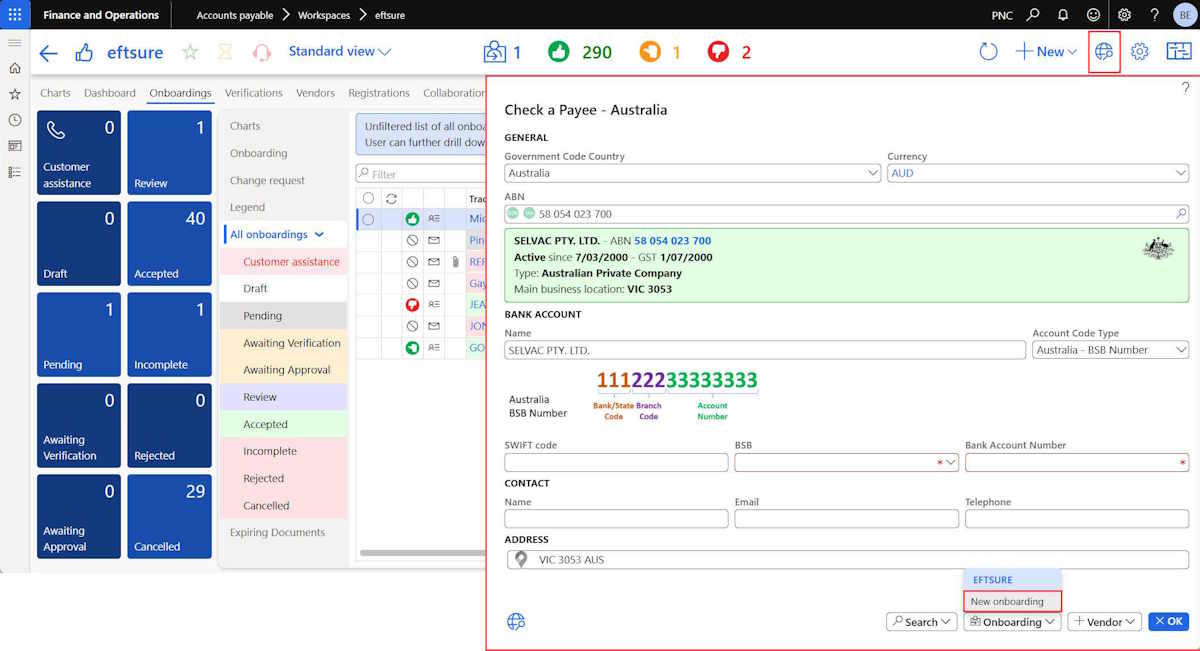
Inviting a supplier within Dynamics 365 F&O can be performed using one of the below options:
Account Payable > Vendors > All vendors form > Button New > EFTSURE ONBOARDING > New onboarding.
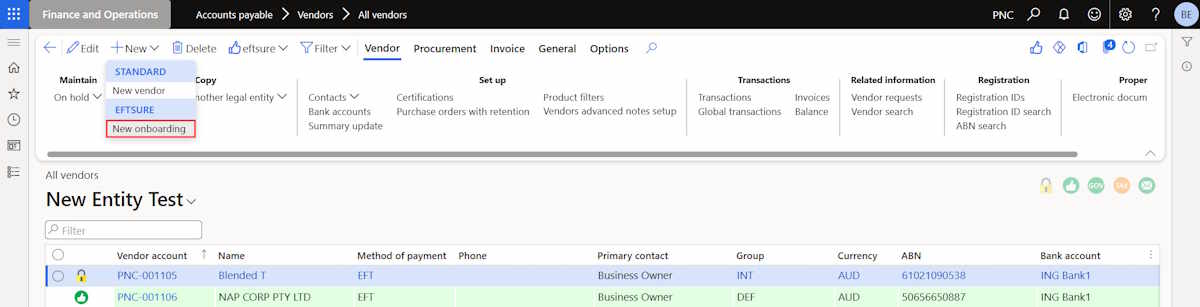
In the scenario where the user does not want to follow Eftsure onboarding process (e.g. creation of Vendors excluded from Eftsure verification), the Button New > STANDARD > New vendor will bring up a blank Vendor master form for manual entry.
Eftsure Workspace > Button New > EFTSURE ONBOARDING > New onboarding.
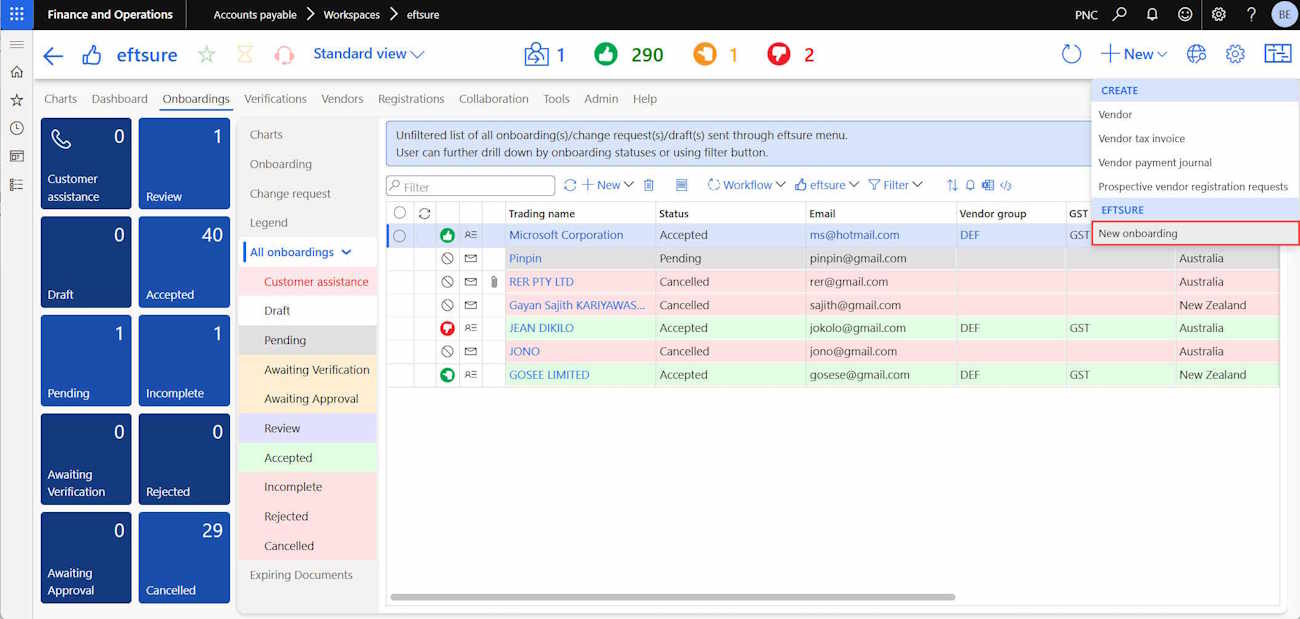
In the scenario where the user does not want to follow Eftsure onboarding process (e.g. creation of Vendors excluded from Eftsure verification), the Button New > [CREATE] Vendor will bring up a blank Vendor master form for manual entry.
• Payee check 
This option can be accessed via Eftsure workspace and All Vendor form.
For more details, please refer to the Eftsure inside Additional features > Payee check
New Vendor invitation
The default onboarding invitation wizard contains 3 steps including New vendor details, Greeting and Options.
If a specific number of steps has been setup for a particular vendor group in Eftsure Parameters, then, once the vendor group is selected, the wizard steps will be displayed accordingly.
The number of steps can be amended and reduced to one. This
configuration is specific to vendor group and is located in the
Parameters
form.
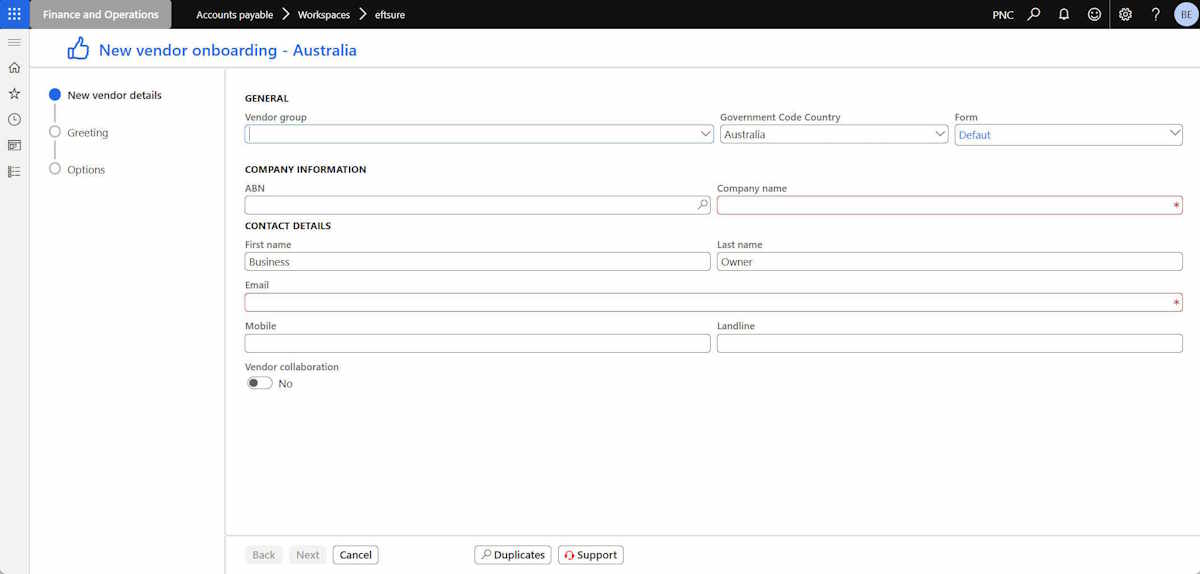
This page contains all the necessary information to send a valid Eftsure onboarding invitation.
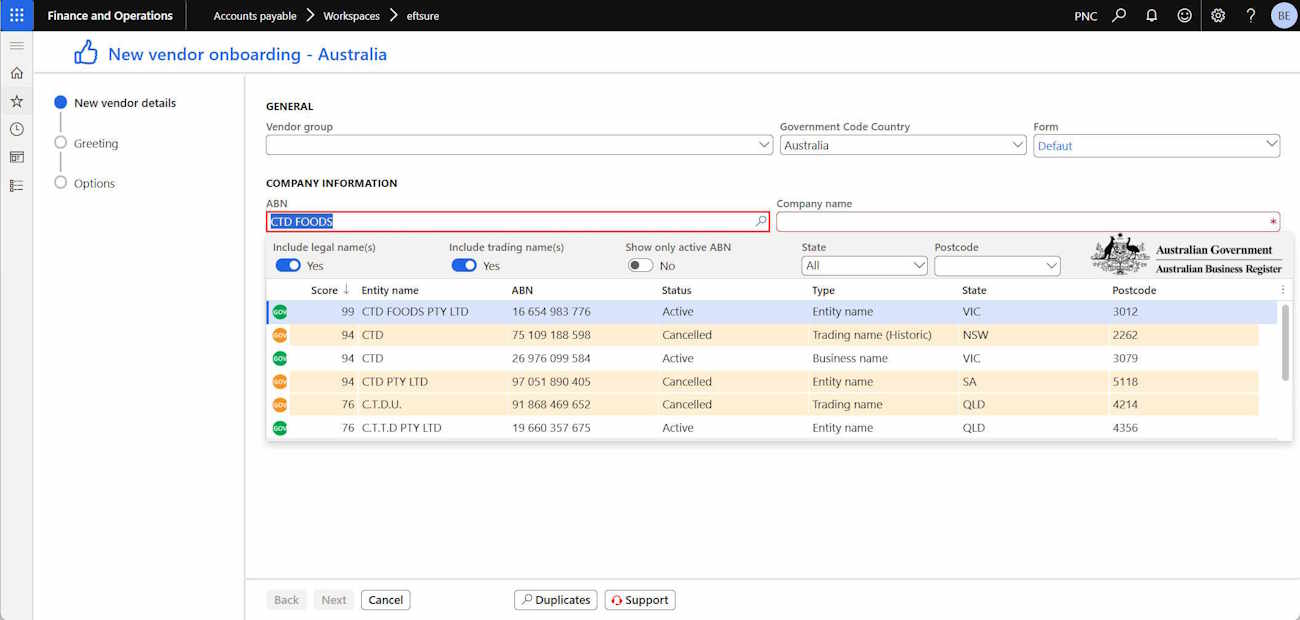
ABN is not a mandatory field. The user can type in a company name and use the ABN lookup with drop down list to select the correct vendor in ABN field - company name will be auto populated.
For more details on ABN please refer to Additional features > ACN & ABN.
| Field name | Description | Notes and Actions |
|---|---|---|
| GENERAL | Vendor group | Classify the new vendor group |
| Government code country | Country name for the company registration | |
| Form | Default onboarding forms can be configured by Vendor group to adapt the onboarding wizard displays based on the vendor type. By default form is read-only, however, user can select different form format basing on configuration under Parameter > Vendor groups > Forms. | |
| COMPANY INFORMATION | ABN search | Enter the vendor name or ABN number in the ABN Number |
| Company name | Auto populate if ABN is available. | |
| CONTACT DETAILS | First name Last name | Vendor contact details, same representative who Eftsure verification team will contact during verification. |
| Valid email address. | ||
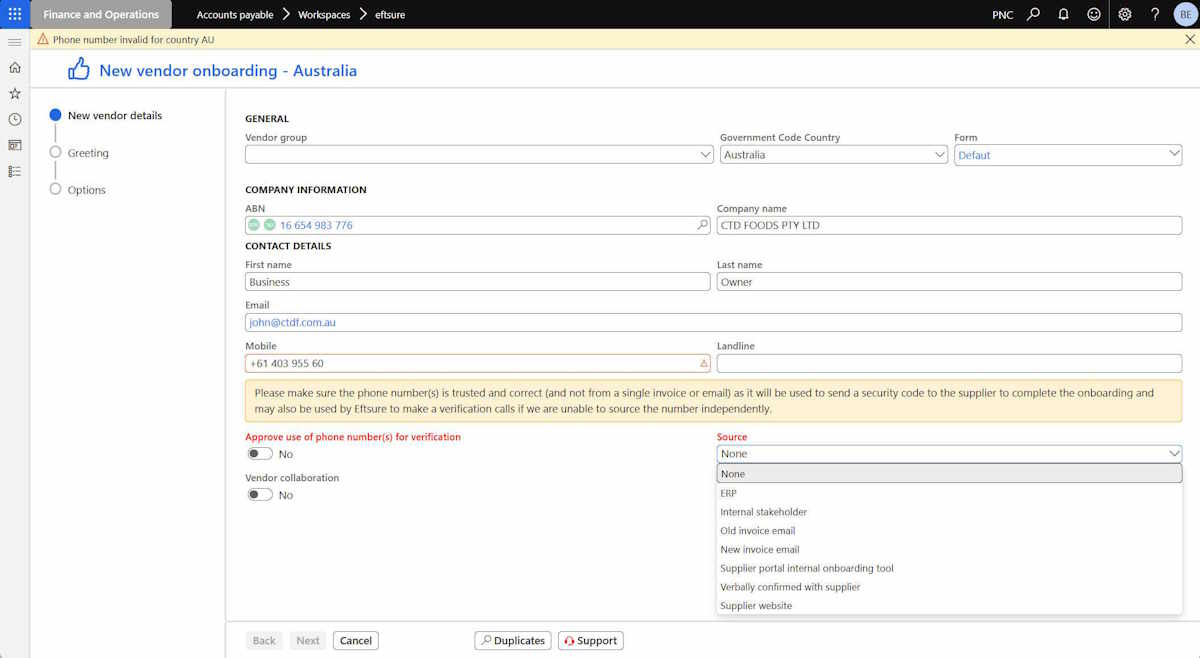
| Mobile | Only accepts mobile numbers and international mobile numbers. When inviting a supplier using an invitation form with 2 factor authentication enabled, the mobile number field becomes mandatory to confirm the supplier's mobile number by SMS | |
| Landline | Single phone number is required in the even that our verification team is not able to source this supplier's contact information independently. Accepts any local phone number, international number, 13xxxx, Toll free numbers, and Shared cost numbers. | |
| Approve use of Phone number for verification | If approved, the Mobile phone number will be used to send a security code to the supplier to complete the onboarding and may also be used by Eftsure to make a verification calls. | |
| Source | Mobile Phone number source. | |
| Vendor Collaboration | For more details, please refer to Vendor Collaboration. |
Several validations are in place both in Dynamics 365 F&O and in Eftsure engine to ensure phone numbers are valid mobile or landline numbers: if the phone number entered doesn't match the expected type of number, the control will turn orange and a notification will be displayed.
The field Vendor group can be blank at this stage, but it's recommended to select a Vendor group if the user wish to invite Vendors using preset Onboarding form(s).
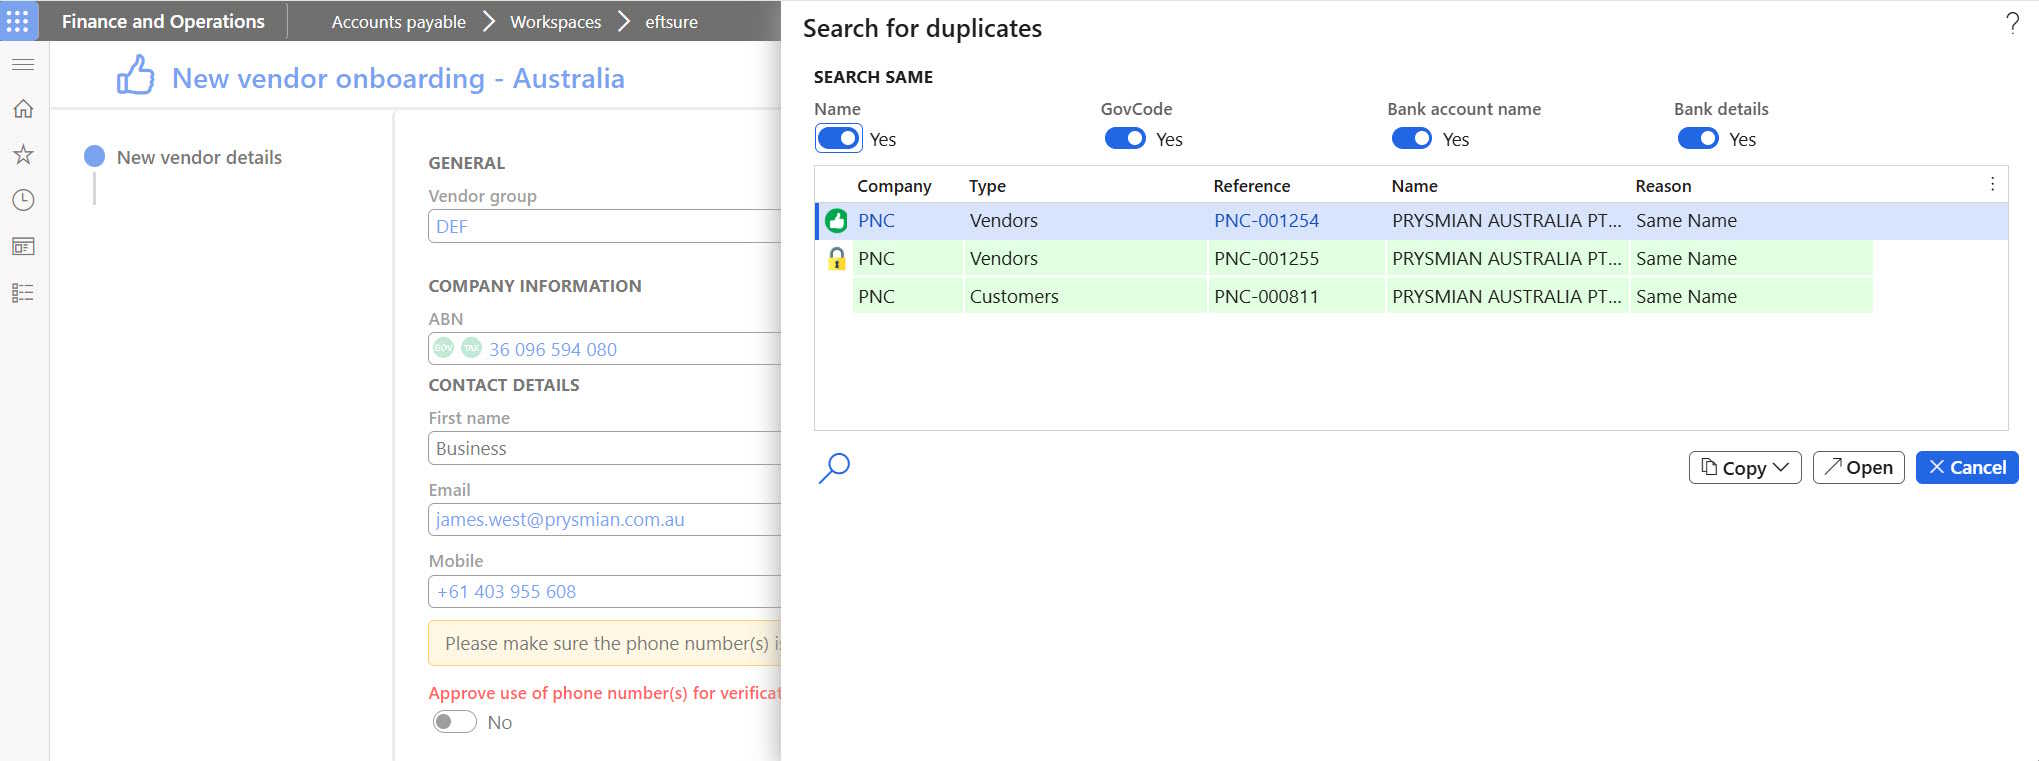
The Search duplicate function  will allow end user to ensure there's no existing record with same ABN, name and bank account etc before onboarding or create the vendor.
Vendor Greeting
Greeting for onboarding or change request can be set as default, either with editable or with non editable options.
This setup is configured by Vendor Group via Parameters > Vendor groups > Greeting >User can edit.
If the editable option is on, it will allow user to manually enter a message that will appear in the vendor onboarding email. The message works with placeholders such as ##FirstName##, ##LastName##.
The user also has option to choose Greeting templates available for selected legal entity or to modify and save a Template for future use.
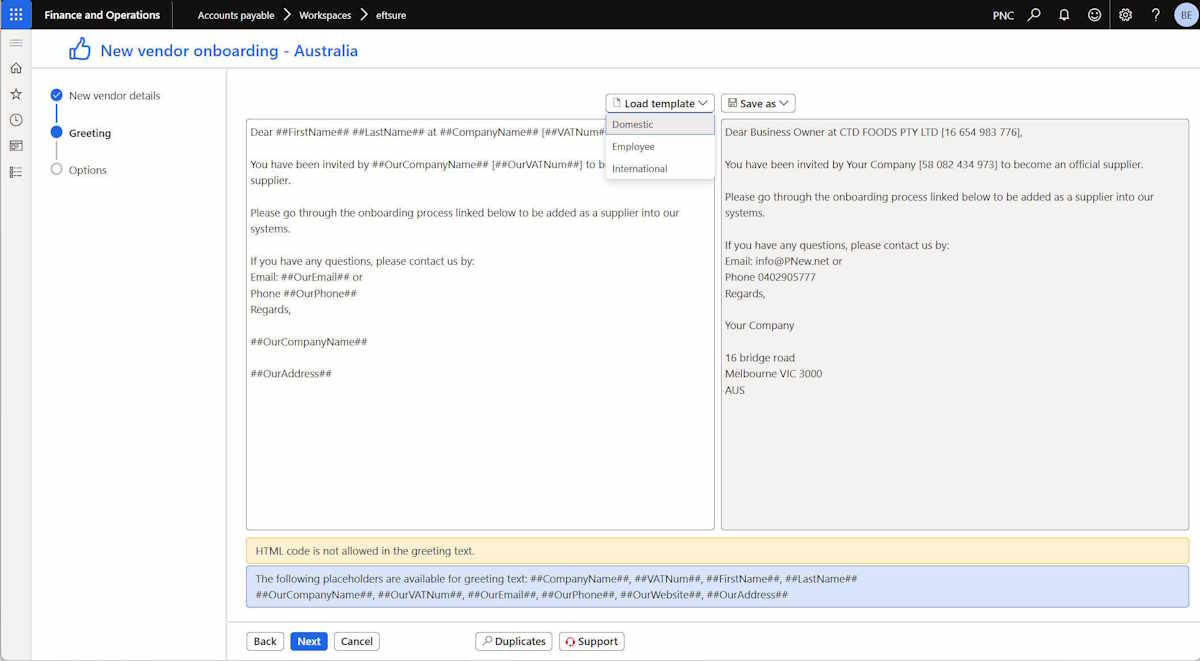
Once the onboarding invite form is completed, it will bring user to the last Options step prior to Sending the invite via Eftsure .
Options
Bank provisioning editable options can be setup via Parameter > Vendor group > Bank Provisioning details.
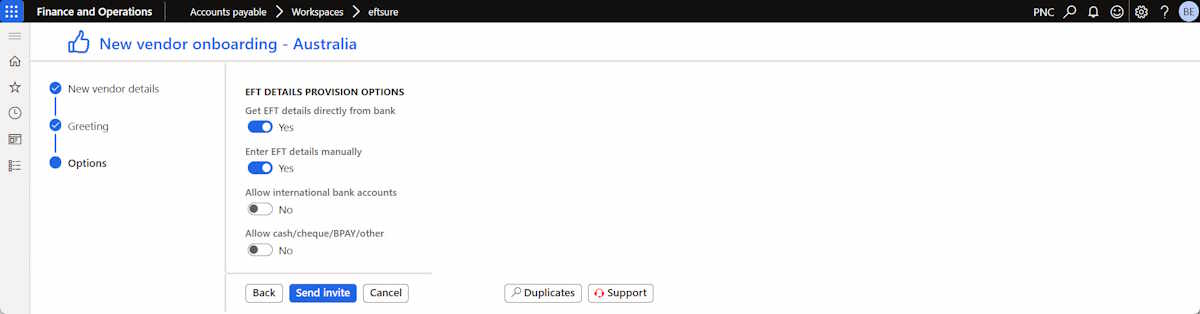
Supplier EFT details provision options:
| Option | Description |
|---|---|
| Get EFT details directly from the bank | This option will prompt the supplier to choose from a drop-down menu and log in to their bank portal through the onboarding form. |
| Enter EFT details manully | Require the supplier to manually enter bank information. |
| Allow international bank accounts | For international suppliers. |
| Allow cash/cheque/BPAY/other | For other payment options. |
Once the Send invite button is triggered, D365 will send a notification an Eftsure onboarding communication to the vendor.
The onboarding will be associated to a Pending status. The onboarding status can be reviewed in Eftsure workspace.
The user can choose to manually sync with Eftsure portal
 or wait for the
automation batch scheduled every hour and set an alert
or wait for the
automation batch scheduled every hour and set an alert
 for any change on
selected vendor(s).
for any change on
selected vendor(s).
Accepting onboarding
Once the vendor completes the onboarding form, the user has the option to Review, Reject, Accept the onboarding.
For more details, please refer to the legend and notes highlighted in Eftsure workspace > Onboardings.
If the bank account is already available in Eftsure database, it will be verified instantly and the onboarding status will be changed to Accepted, by-passing other status(s). This behaviour if configurable (Parameter > Vendor groups > Automation)..
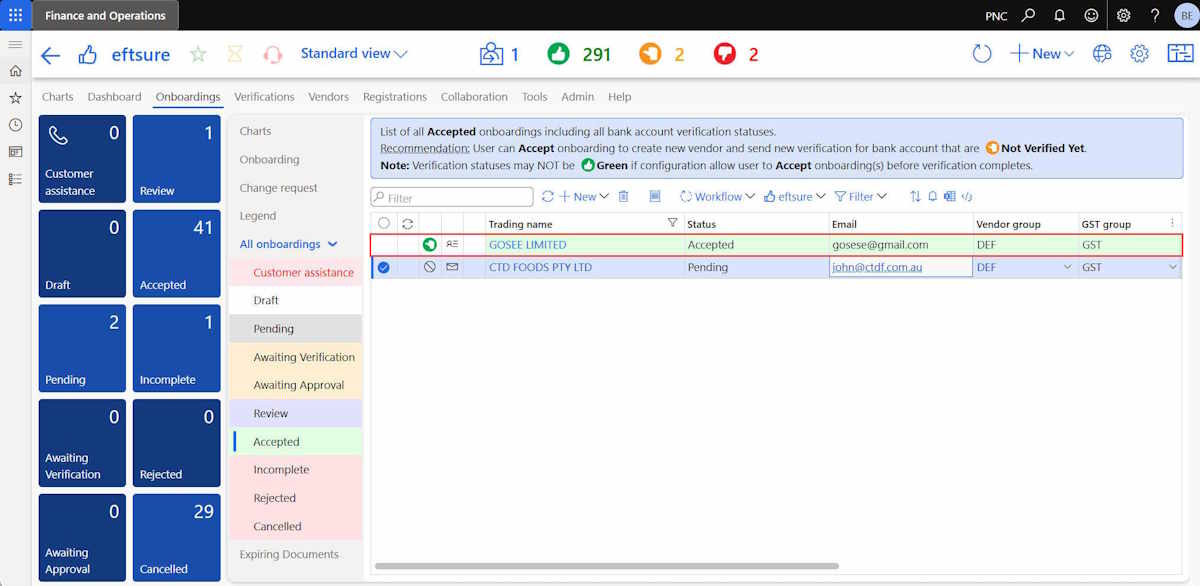
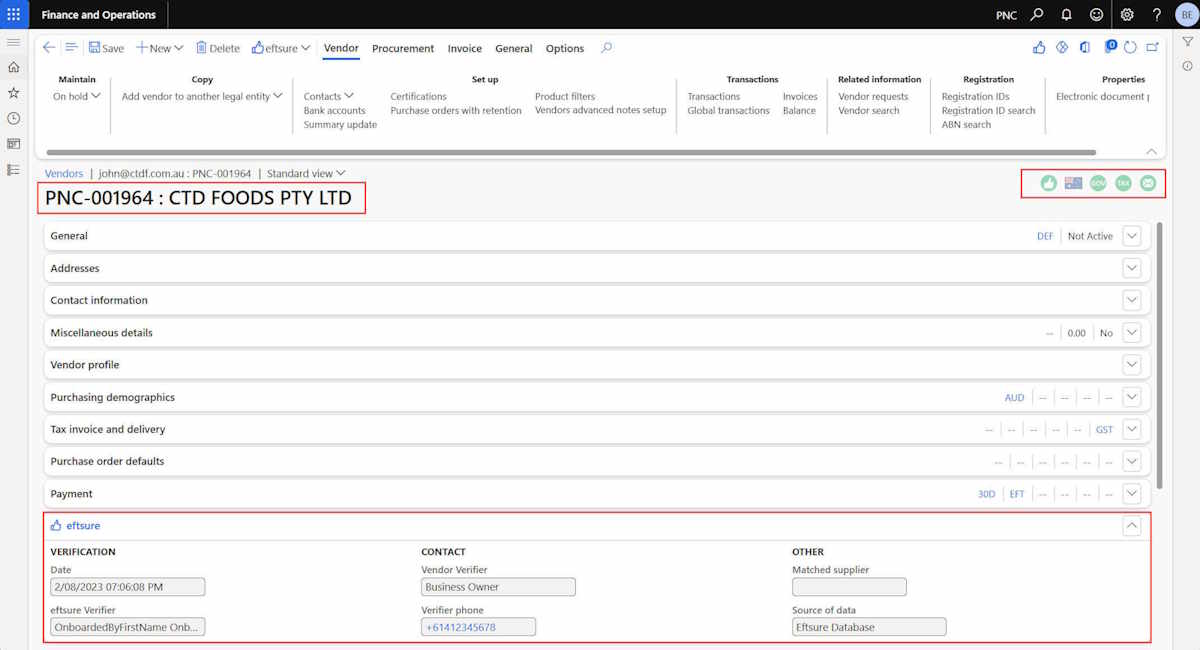
When the onboarding status is changed to Accepted, and if the Vendor account code is set to sequential, a new vendor record will be created in Vendor master file with verified bank account as well as ABN and GST checks.
The user has the option to Review, Reject, Accept the onboarding. For more details please refer to the legend and notes highlighted in Eftsure workspace > Onboardings.
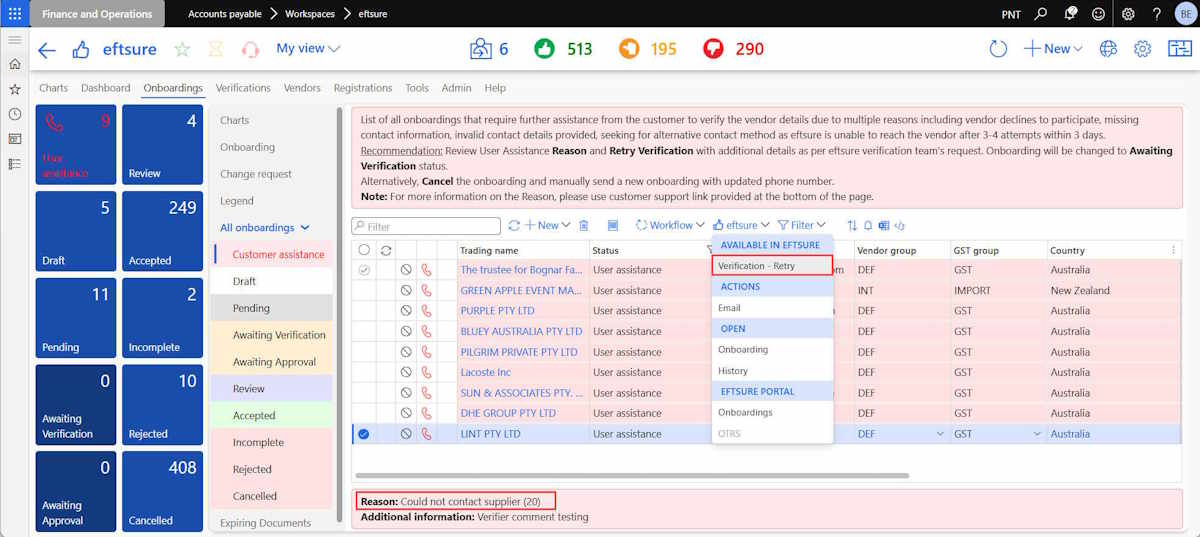
Awaiting for customer assistance
Onboardings that require further assistance from the customer to verify the vendor details due to multiple reasons including vendor declines to participate, missing contact information, invalid contact details provided, seeking for alternative contact method as Eftsure is unable to reach the vendor after 3-4 attempts within 3 days.
Review the section Customer Assistance Reason and Additional information provided at the bottom of the page for more details and actions which need to be taken.
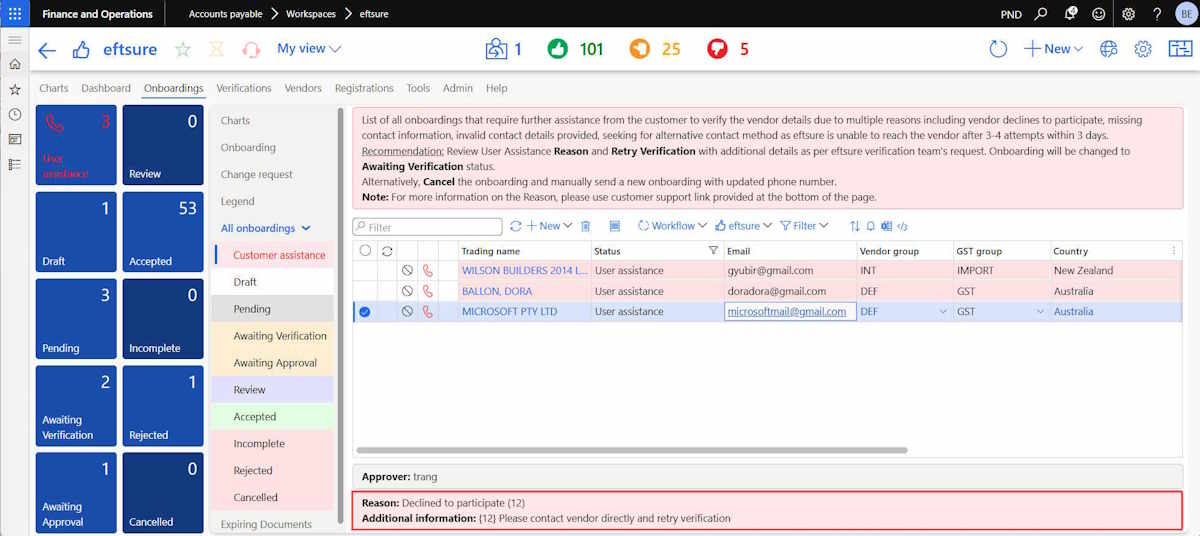
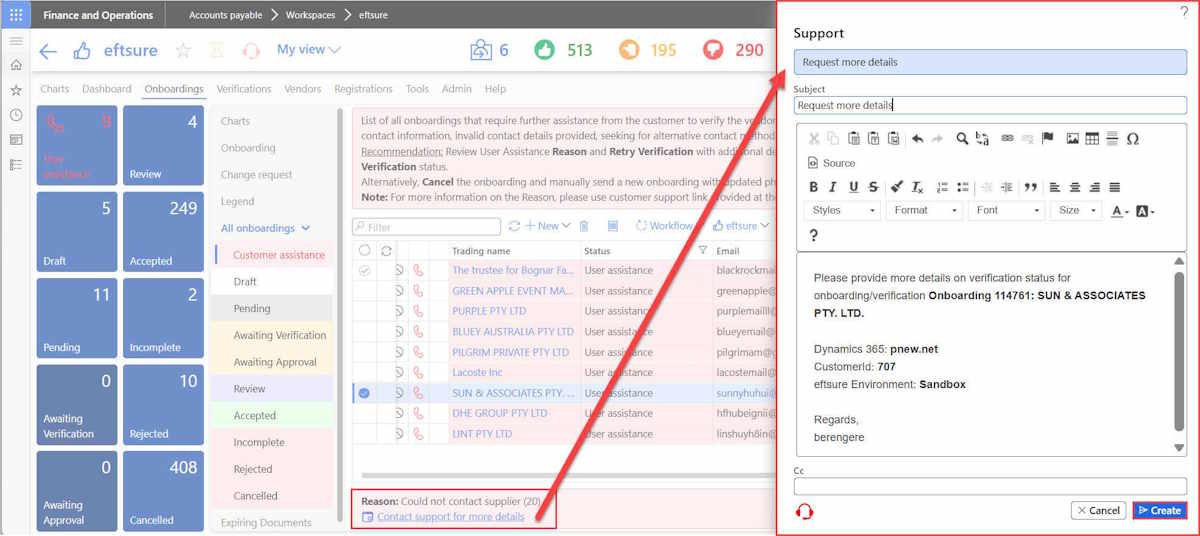
If the user requires more details, e.g. as additional information is not provided, the customer support link will be provided for user convenience.
To continue with the onboarding, the user should select the function Verification retry to provide additional information for Eftsure verification team to continue the verification process.
Update trusted phone number and ensure to authorise Eftsure verification team to call and verify bank account.
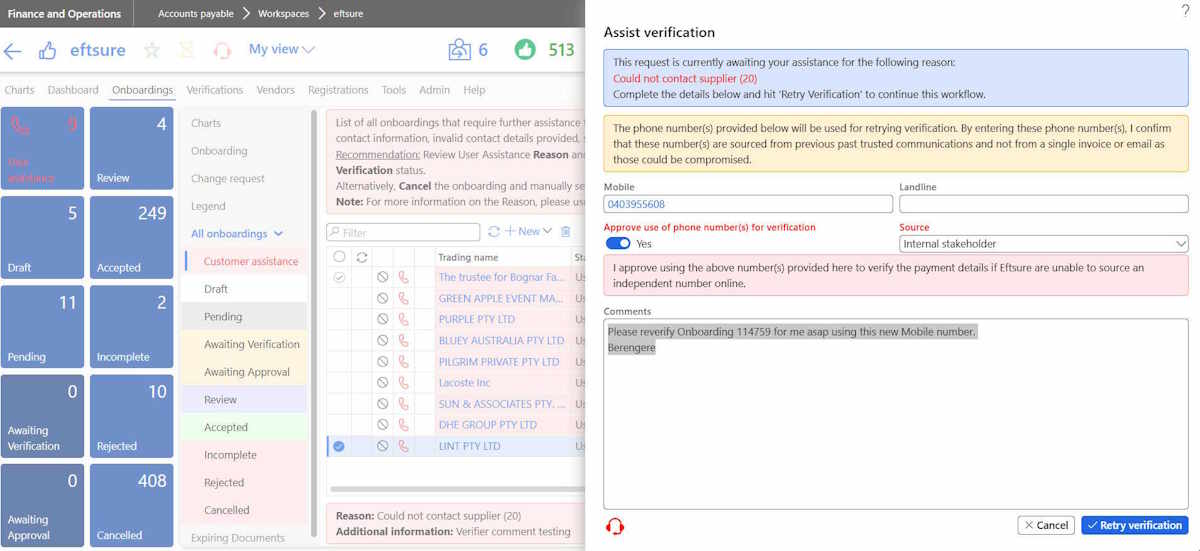
Onboarding status will be changed to Awaiting verification and the verification process will be restarted.